
Last Updated: May 20, 2026 | By the E3 Aviation Editorial Team
Every instrument pilot remembers the first holding pattern entry ATC ever threw their way. The fix was unfamiliar. The radial was off your nose. You had ninety seconds to pick the right entry. This is the moment that separates pilots who own the airplane from pilots who get owned by it.
The good news: a holding pattern entry is not actually that hard. It just looks hard because most pilots learn it once for the checkride. Then they never use it in the wild. By the time you need it for real, the mental model has rusted out. That’s the gap this guide closes.
We’ll walk you through the three entries and the 70-degree rule that picks the right one. We’ll cover the speeds and altitudes you have to know. You’ll get the wind correction trick that keeps your inbound leg on the money. And we’ll cover how to handle the ATC clearance when the call comes. Pilot to pilot. Pull this up before your next IPC.
What a Holding Pattern Is and Why You’ll Get One
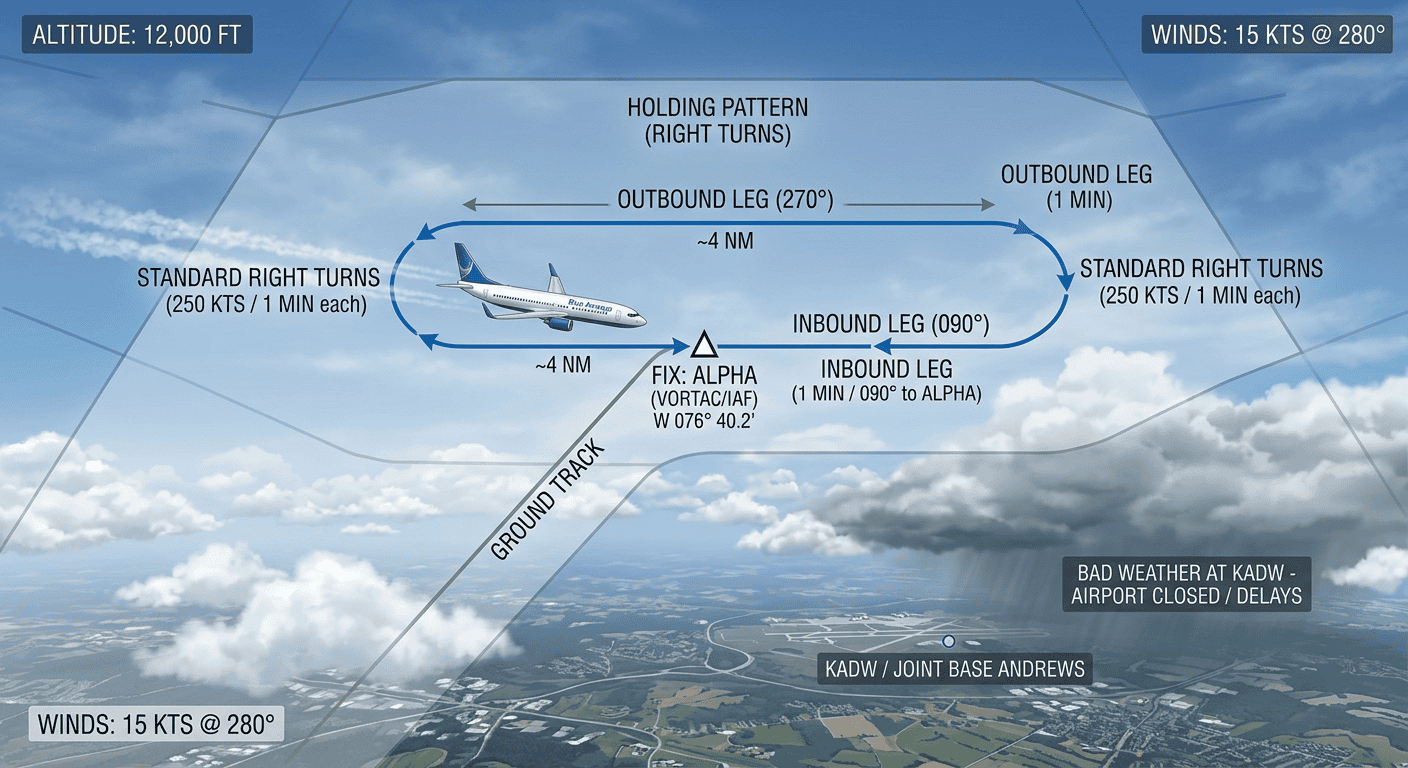
A holding pattern is a racetrack-shaped flight track flown around a fix. ATC uses it to delay you in a known piece of airspace when something downstream isn’t ready for you yet. The pattern keeps you predictable, separated, and clear of terrain or other traffic.
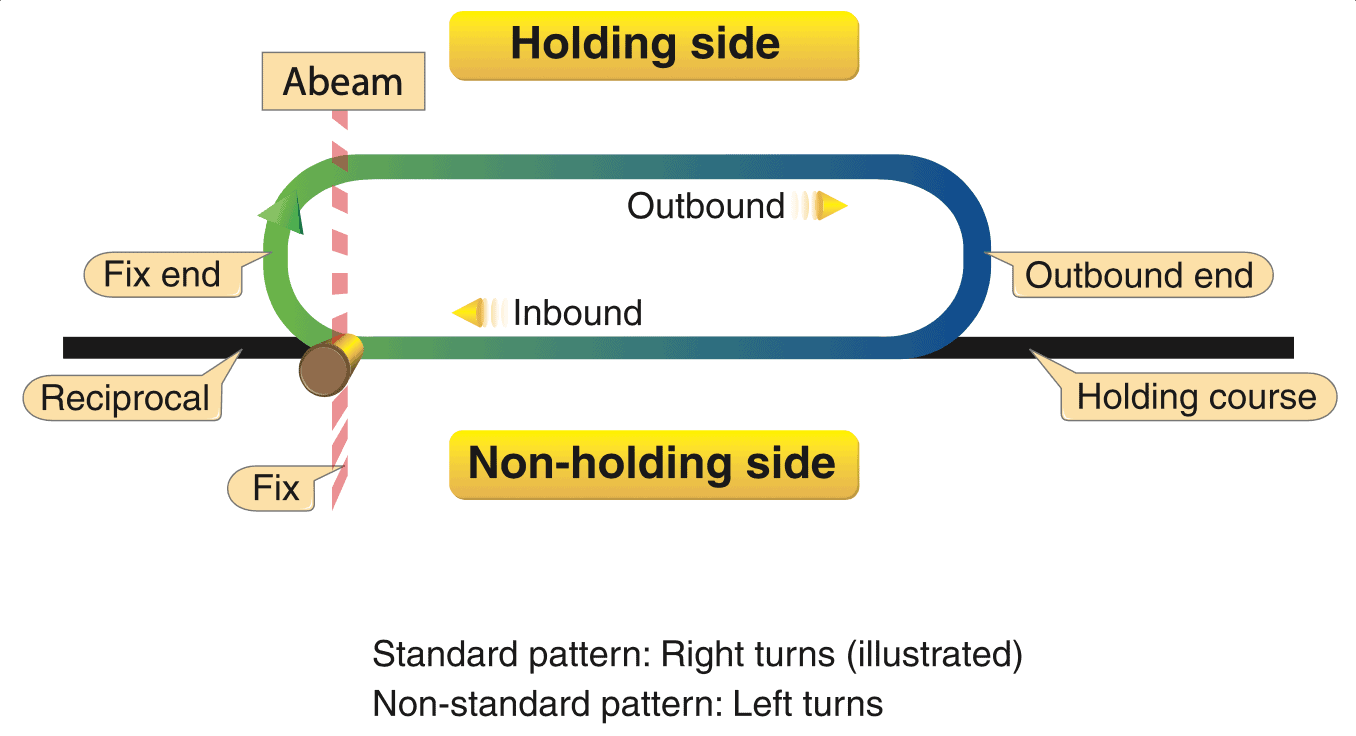
Standard turns are to the right. Each leg is one minute long at or below 14,000 feet MSL, and one and a half minutes above that. Inbound timing is what matters. The outbound leg is adjusted to make the inbound leg hit the target time.
You’ll get a holding clearance for a handful of reasons. Weather at the destination drops below minimums. A runway change forces ATC to re-sequence arrivals. You arrive at an IAF before your approach clearance is ready. Or you’ve requested a hold yourself to buy time. Maybe you want to brief an approach. Maybe you need to sort out an avionics glitch.
Whatever the reason, the airplane needs to be inside the protected airspace of the pattern. The only way it gets there cleanly is the right holding pattern entry.
The Three FAA Holding Entries
The FAA defines exactly three entries: direct, teardrop, and parallel. ICAO uses the same three with different names for the sectors, but the geometry is identical. Every entry the U.S. system asks you to fly will be one of these.
Direct Entry
The direct entry is the easy one. You fly over the fix and turn the same direction as the pattern. That’s right turns for a standard hold. Roll out on the outbound heading. No teardrop angle, no parallel offset. Cross the fix, turn, start the timer.
Direct covers the largest sector — 180 degrees around the fix. When your arrival heading lines up roughly with the holding side, direct is the right call.
Teardrop Entry
The teardrop covers a 70-degree slice on the holding side of the inbound course. You cross the fix and turn outbound to a heading 30 degrees offset from the outbound leg. The offset angles into the holding side. Fly that heading for one minute. Then turn in the direction of the pattern to intercept the inbound course.
The teardrop is the most efficient entry when geometry allows. It sets you up on the inbound course quickly with a single clean turn at the end. This is the smoothest holding pattern entry when the wind cooperates.
Parallel Entry
The parallel entry covers the 110-degree slice on the non-holding side. You cross the fix and turn to a heading that parallels the inbound course outbound. Hold that parallel heading for one minute. Then turn through more than 180 degrees back toward the holding side. Intercept the inbound course on the way back, or return to the fix.
This is the entry pilots fumble most often. The final turn goes through the holding side, not away from it. Get that turn direction wrong and you fly yourself outside protected airspace immediately.
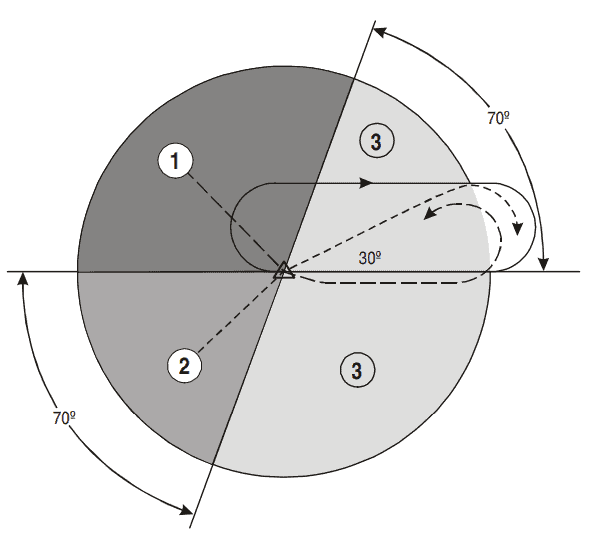
The 70-Degree Rule
The 70-degree rule is the mental shortcut that picks the right holding pattern entry in about three seconds. It divides the airspace around the fix into three sectors, and your arrival heading drops you into one of them.
Picture the inbound course as a line through the fix. Now draw a perpendicular line through the fix at 90 degrees to the inbound course. That perpendicular line splits the airspace into two halves — the holding side and the non-holding side.
Then rotate the perpendicular line 20 degrees toward the holding side. That rotated line, plus the inbound course extended, defines the teardrop sector. The teardrop sector is 70 degrees wide on the holding side. Everything else on the holding side is the direct entry zone. The opposite 180 degrees of the perpendicular line is also direct. The remaining 110 degrees on the non-holding side is the parallel zone.
Add it up: direct 180°, teardrop 70°, parallel 110°. That’s the full 360 around the fix.
The Thumb-and-Index-Finger Trick
Most instrument pilots learn one of two quick visualizations. The most popular: hold your right hand up with the thumb at 70 degrees off the index finger. Point the index finger along the outbound heading (the reciprocal of the inbound course). Whatever your heading bug or HSI shows for your arrival heading, see which finger it’s between.
Thumb side = teardrop. Index finger side, beyond the perpendicular = parallel. Everything else = direct. It sounds silly until you’ve used it a few times. Then it becomes muscle memory.
The “Same Side, Different Side” Shortcut
Here’s an even simpler shortcut once you understand the geometry. If your arrival heading is on the holding side and within 70 degrees of the outbound heading, teardrop. If it’s on the non-holding side, parallel. Everything else, direct.
The 70 degrees is the only number you have to remember. Most pilots default to direct when the geometry is ambiguous. That’s fine. ATC and the regs allow it, and the protected airspace is sized for it.
Standard Holding Speeds You Have to Know
The FAA publishes maximum holding airspeeds by altitude. Memorize them. They show up on every IPC.
- MHA up to 6,000 feet MSL: 200 KIAS maximum
- 6,001 to 14,000 feet MSL: 230 KIAS maximum
- 14,001 feet MSL and above: 265 KIAS maximum
One exception worth knowing: published holding patterns between 6,001 and 14,000 feet may be restricted to 210 KIAS. When that’s the case, the chart shows a small icon near the holding fix. Always check the chart, not your memory.
For most piston GA pilots, none of these numbers will ever be the limiting factor. You’re flying a Cessna 172 at 90 knots in the hold, or a Bonanza at 130. The speed limits matter most for turbine and jet traffic. But the question shows up on knowledge tests, IPCs, and checkride orals alongside the holding pattern entry picks. So you have to know it cold.
Inbound Leg Timing and the Wind Correction Trick
Once your holding pattern entry is flown, the leg you adjust is the inbound leg. Below 14,000 feet, the standard inbound leg is one minute. Above 14,000 feet, it’s one and a half minutes. Time the inbound leg. Adjust the outbound leg to make the inbound leg hit that target.
Wind is the variable that wrecks your timing if you don’t manage it. With a tailwind on the outbound leg and a headwind inbound, the inbound leg gets long. With a headwind outbound and a tailwind inbound, the inbound leg gets short. Adjust the outbound leg in the opposite direction of the inbound problem.
The Triple Wind Correction Rule
For the crosswind component, instrument pilots use the triple correction technique. Find your wind correction angle on the inbound leg by watching your track over the ground. Whatever that angle is, triple it on the outbound leg. The triple goes in the opposite direction.
Eight degrees of correction inbound? Twenty-four degrees outbound. Five inbound? Fifteen outbound. The math is simple. The reasoning is less obvious. Between crossing the fix outbound and intercepting inbound, you spend three minutes exposed to wind. That’s one minute in the outbound turn, one minute on the outbound leg, and one minute in the inbound turn. The single outbound minute has to compensate for all three.
We’ll be straight with you. Most of us forget the triple in the airplane and end up sloppy on the first turn. The fix is to verbally call it out as you cross the fix. “Crab eight inbound, twenty-four out.” Saying it makes you fly it.
The ATC Holding Clearance and What to Read Back
A complete holding clearance has a specific format. ATC is required to issue all the elements when delay is expected. The clearance comes at least five minutes before you reach the clearance limit. Here’s what a complete clearance includes.
The clearance limit — the fix you’ll hold at. The direction of holding from the fix (north, east, southeast). The holding course (the radial, course, or airway). The leg length if non-standard. The direction of turns if non-standard (left turns instead of standard right turns). The expect further clearance time. Any altitude or delay information.
A typical clearance sounds like this. “Cessna 12345, hold east of LANCE on Victor 24, right turns, maintain 4,000, expect further clearance one-eight-three-five Zulu.”
How to Read It Back
Six things on the read-back: fix, direction of holding, holding course, non-standard turns, EFC time, and assigned altitude. You don’t have to read back the leg length unless it’s non-standard. ATC needs to hear enough to confirm the geometry.
If anything in the clearance is unclear, ask. On a published hold, ATC may give you only the fix name and the EFC. The rest is on the chart. “Approach, are these standard turns at LANCE?” is not a stupid question. Flying the wrong turn direction is.
Published vs. Non-Published Holds
A published hold is depicted on a chart — usually an instrument approach plate, an enroute chart, or a STAR. ATC will give you the fix name and the EFC, and you’ll fly what the chart shows. A non-published hold (“hold west of LANCE on the 270 radial, left turns”) requires the full clearance. There’s no chart to reference for those.
Always have the chart open before you accept the clearance. If you’re flying with electronic charts, find the fix and look at the depicted hold before you read back. A 10-second delay to confirm beats five minutes of confusion in IMC. The right holding pattern entry starts with the right brief.
The Expect Further Clearance Time and Lost Comms
The EFC time is more than a fuel-planning number. It’s the lost-communications timer that pairs with every holding pattern entry you accept.
If you lose radios while holding, FAR 91.185 tells you exactly what to do. Continue holding until the EFC time. At the EFC time, leave the hold on your last assigned route. Or use the most recent expected route, if one was given. Continue to the destination and shoot an approach.
That’s why the EFC is required in every clearance involving delay. Without it, you have no defined departure time from the fix in a lost-comms scenario. It’s also why you write the EFC down the second you hear it. Six minutes of holding plus an avionics glitch plus a missed EFC equals a flight without a plan.
The Cessna 172 Pilot’s Practical Hold
Here’s what a real holding pattern entry looks like for a piston single. Cruise speed in the hold drops to about 90 KIAS. That conserves fuel and keeps the bank angle reasonable. Standard rate turns work fine. The radius of turn at 90 knots is tiny compared to the protected airspace.
Configure for the hold the same way you’d configure for an approach, minus the gear and flaps. Throttle back to a known fuel-burn setting. Trim for hands-off. Set the heading bug before you cross the fix. Brief the entry out loud. “Direct entry, right turn at the fix, outbound three-zero-zero, one minute, then right turn inbound.”
Honestly, this is where we’d push back on how holds get taught in some training programs. The classroom version makes the entry sound complicated. The airplane version is just three or four heading bug changes. Time each leg off your wristwatch or panel timer. Pre-set the bug. Fly the bug. Restart the timer at each turn. The geometry takes care of itself.
Common Mistakes Pilots Make in the Hold
Three mistakes account for most busted holds and botched holding pattern entry sequences. None of them are technically hard. All of them are flown wrong because the pilot got task-saturated.
First: the parallel entry turn direction. Pilots roll out parallel outbound, fly their minute, and then turn the wrong way at the end. They turn away from the holding side instead of through it. That puts you on the wrong side of the inbound course and outside protected airspace. The parallel entry’s final turn is always through the holding side.
Second: outbound timing started in the wrong place. The outbound timer starts when you’re abeam the fix on the outbound leg, not when you cross the fix. If you can’t see the fix abeam your wing, start the timer when you roll out on the outbound heading. Both options are accepted. Crossing the fix is not when timing starts.
Third: failing to adjust the outbound leg. The whole point of the outbound leg is to set up the inbound leg for one minute. A two-minute inbound leg with a tailwind is not a hold. It’s a freelance excursion. If inbound is long, shorten outbound. If inbound is short, lengthen outbound. Adjust each circuit.
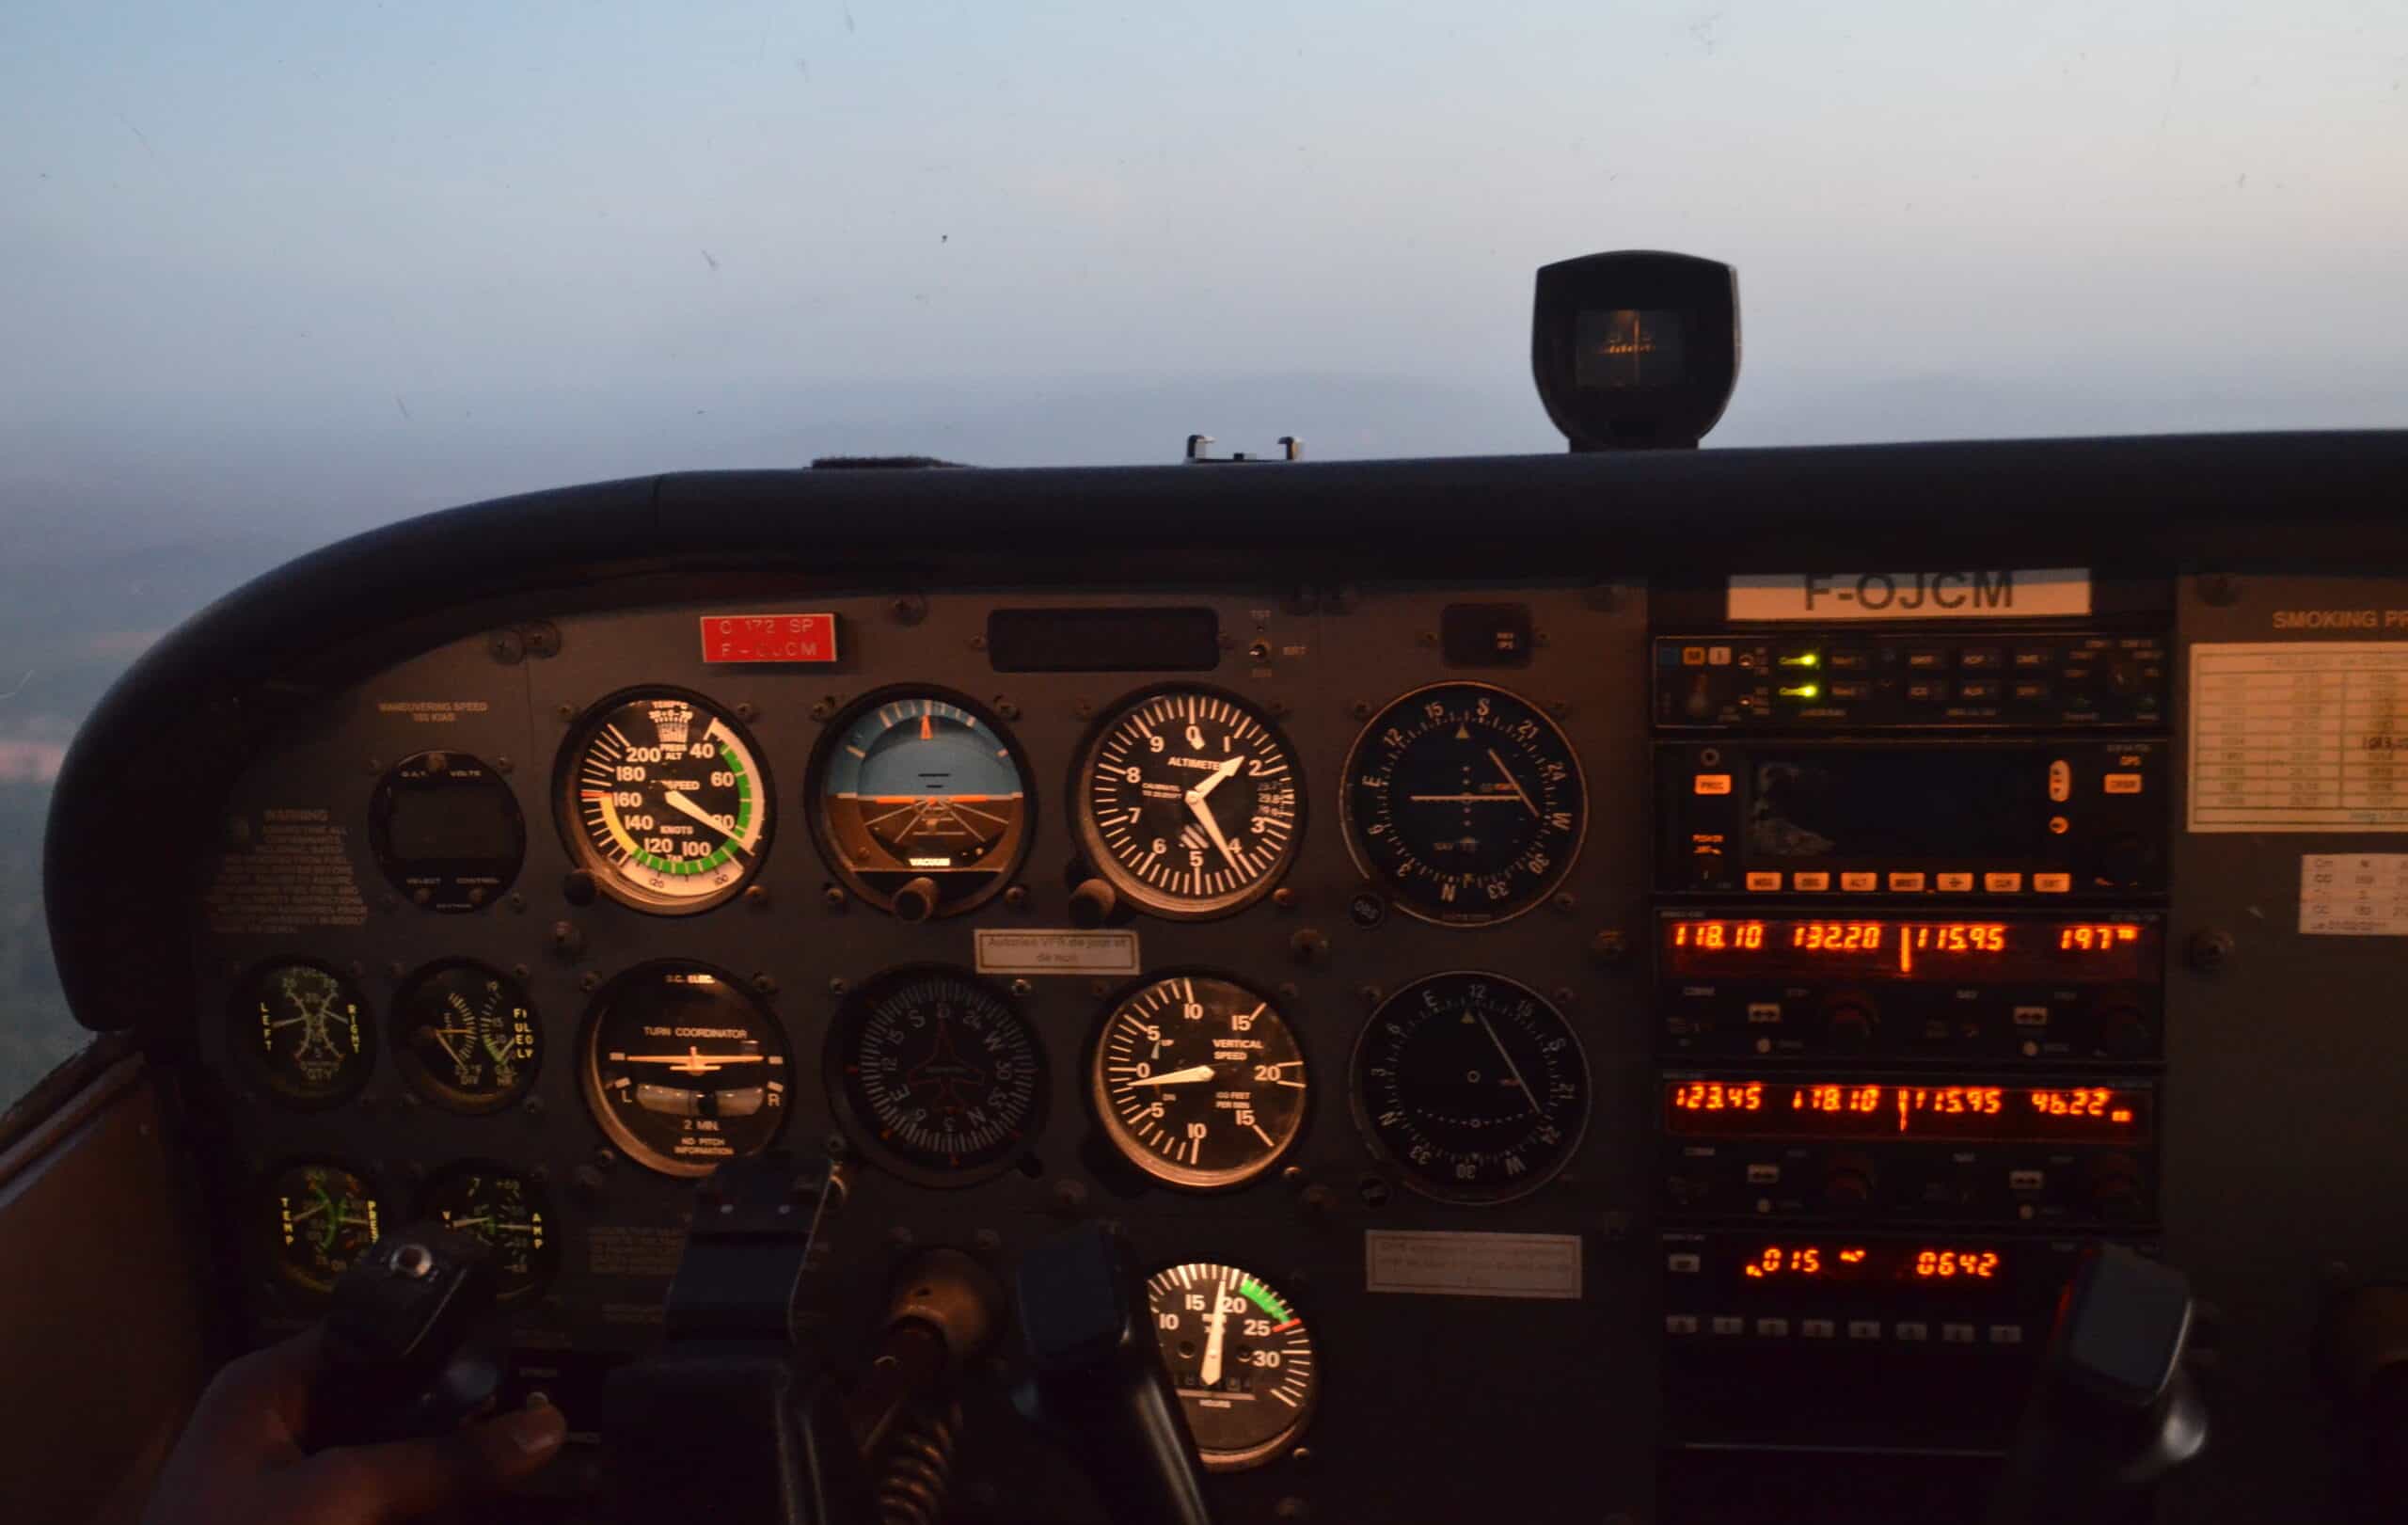
Holding in a Glass Panel vs. a Steam-Gauge Aircraft
A modern Garmin G1000 or G3X with GPS holds will do most of the geometry for you. Load the procedure with the published hold. Hit OBS or activate the hold in the flight plan. The magenta line draws the pattern. Wind correction is automated. The system shows the holding pattern entry it will fly.
That doesn’t mean you can stop thinking about it. The autopilot will fly the displayed pattern. But you still own the timing, the speed, the altitude, and the entry brief. Glass makes the geometry easier and your situational awareness harder. You can fly a perfect hold without ever knowing you flew the wrong entry.
Steam-gauge airplanes force you to do the geometry in your head. That’s actually a feature, not a bug, for learning. Most CFIIs hold off on the GPS-coupled hold until the student can fly it raw-data. That means VOR, RMI or DG, timer, pencil. Trained in glass and haven’t done a paper hold in years? Find a friend with a Cessna 172 and a working VOR. Brush it up. Your IPC will go better. So will the day you lose the GPS in the soup.
FAQ — Holding Pattern Entry Questions Pilots Actually Ask
Do I have to fly the textbook entry, or can I just turn directly toward the inbound course?
The textbook entry is recommended, not strictly required. The AIM says the three entries are recommended procedures. In practice, ATC and the FAA expect you to fly one of them. The protected airspace is designed around them. If you cut a corner that keeps you inside protected airspace, no one will yell at you. If you cut a corner that takes you outside, that’s a problem. When in doubt, fly the published holding pattern entry.
What’s the difference between a “hold-in-lieu-of-procedure-turn” and a regular hold?
A hold-in-lieu (HILPT) is depicted on an approach plate at an intermediate fix and replaces the procedure turn. Fly the entry per the 70-degree rule. Then leave the hold as soon as you’re established inbound. You don’t have to fly a full circuit unless ATC tells you to. A regular hold means you stay in the racetrack until you get further clearance or your EFC expires.
Can I ask ATC for a different hold or a shorter delay?
Yes. If the assigned hold puts you in bad weather, near terrain, or far from a fuel option, request alternatives. “Approach, Cessna 12345, request hold over a different fix” or “request priority due to fuel state” is reasonable. ATC may not be able to accommodate — but you’ll never know if you don’t ask. Holding is a tool, not a sentence.
Our Take on Learning Holds the Right Way
Here’s what most pilots get wrong about the holding pattern entry. They treat them as a checkride box to check. They fly two with an instructor before the IPC. Then they never think about them again. That’s why the first real holding clearance after an instrument rating feels like an ambush.
The fix is simple. Once a quarter, grab a safety pilot on a clear VFR day. Find an unfamiliar VOR. Fly a self-assigned hold. Pick a random radial. Brief the entry. Fly the geometry. Twenty minutes a quarter keeps the skill alive. You won’t sweat the call when it comes for real.
That’s the kind of practice that separates E3 pilots from pilots who just hold a rating. The E3 ambassador roster is full of pilots who treat proficiency as a constant project. Blue Angels alumni, ATP captains, backcountry instructors — none of them treat currency as a once-a-year tax. The community standard is to actually be sharp.
Further Reading on the E3 Site
Build out the rest of the IFR cluster while it’s fresh. Start with our piece on holding patterns in aviation for the broader operational context. Pair it with our V-speeds reference — VS, VA, and VFE all matter in the hold. Brush up on the Cessna 172 complete guide if you fly the most common GA airplane for instrument work. For the weather side, see our density altitude guide and our stall recognition and recovery piece.
Ready to take instrument proficiency past legal currency? The E3 community is where pilots level up. Membership gets you ambassador-led proficiency content, gear discounts, and a network of pilots who fly seriously. Join E3 Aviation Association and fly with the people who push you to be sharper.
