
Last Updated: May 4, 2026 | By E3 Aviation Editorial Team
If you fly IFR in 2026, the RNAV approach is your bread and butter. It’s on plates from rural strips to Class B airports. It’s what ATC will assign. It’s what your passengers are counting on when the ceiling drops.
But a lot of GA pilots still treat it like a black box — program the box, fly the magenta line, hope for the best. That’s not good enough. You need to know what’s happening behind the approach, what the plate is actually telling you, and where things go wrong.
This article breaks all of it down.
What Is an RNAV Approach and Why It Replaced Everything Else
RNAV stands for Area Navigation. It’s a method of instrument navigation that lets you fly precise routes without needing ground-based navaids directly below your flight path. Instead, your avionics — GPS, VOR/DME, or DME/DME — compute your position continuously and guide you along a defined path.
The FAA has been building out RNAV approaches for years. They replaced a huge chunk of the old VOR, NDB, and localizer-only approach inventory. Many of those older procedures have been decommissioned or are on the way out. If you haven’t noticed the shift yet, look at your local Jeppesen or ForeFlight plate count. RNAV procedures dominate.
Here’s why that happened: RNAV approaches are cheaper to publish, easier to maintain, and — when flown correctly — more precise than most older approaches. They don’t need an ILS antenna at the runway. They don’t need a collocated VOR. They just need satellites, software, and a properly certified avionics suite.
In the GA world, the term “RNAV approach” almost always means GPS-based. Your GNS 430W, GTN 750Xi, or G1000 NXi avionics are all capable of flying RNAV approaches — but your equipment certification and currency matter more than most pilots realize.
One thing worth knowing: RNAV approaches are only as good as the signal feeding them. If GPS integrity fails, if there’s receiver interference, or if you’re operating in an area affected by GPS spoofing threats, the approach may not be available when you need it. We’ll cover equipment requirements and how to protect yourself later in this article.
The short version: RNAV is here to stay. It’s the primary instrument approach system for GA pilots now. The more fluent you are with it, the safer you’ll be.
The Three Types of RNAV Approaches Every Instrument Pilot Must Know

Not all RNAV approaches are created equal. The plate gives you multiple minimums lines, and each one reflects a different level of precision. Knowing which one your equipment qualifies for — and which one you’re actually flying — is non-negotiable.
LNAV: The Floor-Level Option Most Pilots Default to Without Thinking
LNAV stands for Lateral Navigation only. It gives you horizontal guidance but no vertical guidance from the approach system itself. You fly to a Minimum Descent Altitude (MDA), level off, and look for the runway.
LNAV minimums are the highest on the plate — meaning the least favorable weather you can legally descend into. Typical LNAV minimums run 400-600 feet AGL. That’s more limiting than what you can achieve with vertical guidance.
Any panel-mount GPS certified to TSO-C129 or TSO-C146 can fly LNAV minimums. That covers a wide range of older installed equipment. But you’re leaving precision on the table if your system can do better.
LNAV/VNAV: Baro-VNAV Vertical Guidance That Changes the Game
LNAV/VNAV adds vertical guidance — but it’s baro-VNAV, meaning your avionics use barometric altitude, not GPS, to compute the vertical path. The result is a Decision Altitude (DA) instead of an MDA. That means you’re flying a continuous descent profile rather than leveling off at the bottom.
The catch: baro-VNAV is temperature sensitive. Cold temperature corrections apply at many airports. If you’re flying into a field on a cold winter morning and the temperature is well below the certified operating range, LNAV/VNAV isn’t your best option.
You need a certified WAAS GPS with approved baro-VNAV capability to fly LNAV/VNAV minimums. Most modern GA avionics qualify, but confirm your Pilot’s Operating Handbook supplement and the AFM/POH before you assume.
LPV: The Closest Thing to ILS That GPS Can Offer
LPV stands for Localizer Performance with Vertical Guidance. This is the top tier of the RNAV approach world. LPV uses WAAS — the Wide Area Augmentation System — to deliver both horizontal and vertical guidance with precision that can rival a Category I ILS.
LPV minimums can get as low as 200 feet AGL with a half-mile visibility. That’s ILS territory. Not every RNAV approach has LPV minimums — you’ll see “LPV” on the plate if it’s available — but when it’s there and your equipment qualifies, use it.
To fly LPV, you need a WAAS-capable GPS certified to TSO-C146. That includes Garmin’s GTN series, the G1000/G1000 NXi, the Avidyne IFD series, and most modern panel-mount WAAS units. Your equipment needs to annunciate “LPV” on the approach — not just “LNAV.” If you see only LNAV, fly LNAV minimums.
There’s also LNAV+V — an advisory vertical path that some WAAS units display. It’s not an approved approach type. It doesn’t change your minimums. You still use LNAV MDA. Don’t confuse it with LPV.
To fly any of these approaches legally, you need your instrument rating current and your avionics qualified. That’s step one, always.
Reading the RNAV Approach Plate: What Each Section Tells You

The plate is your contract with the approach. Every number on it has a job. Here’s how to read it.
The Briefing Strip: Everything You Need Before You Call Approach
The top of the plate — the briefing strip — gives you the approach name, the airport identifier, and the frequencies you need. For an RNAV approach, you won’t have an ILS frequency, but you’ll still see the ATIS, tower, and approach control frequencies.
Look at the airport elevation, the MSA (minimum safe altitude) ring, and the transition routes listed. Know your entry points before you’re handed off.
The procedure name tells you everything. “RNAV (GPS) RWY 28L” means you’re using GPS as the primary nav source on a procedure that ends at Runway 28L. Some plates say “RNAV (RNP)” — those are different and need RNP AR authorization. Don’t confuse them.
Our take: The briefing strip is where most rushed pilots skip details. Altitude restrictions on transitions, step-down fixes, and missed approach instructions live in that section. Brief it on the ground. Brief it again in cruise. Don’t brief it for the first time on the turn to final.
The Plan View: The Big Picture from Above
The plan view is the overhead map showing the approach course, all the named fixes, the IAFs (initial approach fixes), the IF (intermediate fix), the FAF (final approach fix), and the MAP (missed approach point).
On an RNAV approach, the FAF is identified with a Maltese cross symbol. The MAP is typically at the runway threshold or a specified distance from it. Know where both are before you start down.
The plan view also shows obstacle clearance areas. If there’s a note about circling minimums or specific terrain considerations, it’ll show up here or in the notes section.
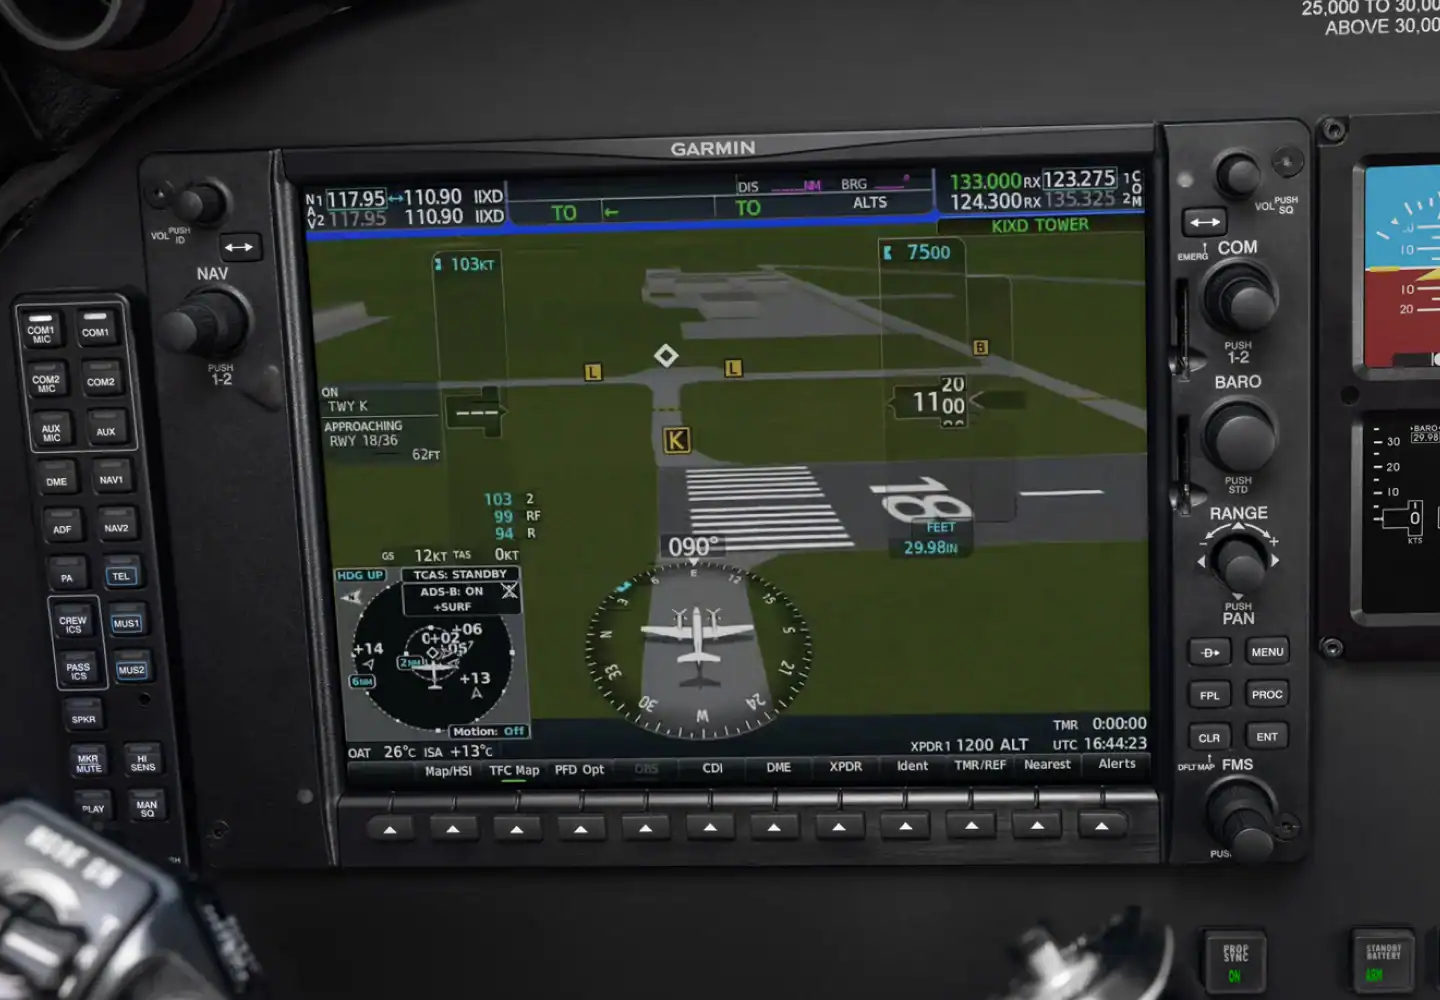
The Profile View: Your Vertical Picture
The profile view shows the approach from the side. It shows crossing altitudes at each fix, the glidepath angle (usually 3.00 degrees for a standard RNAV approach, but not always), and the TCH — the threshold crossing height.
Check the glidepath angle. Some approaches have steeper angles — 3.5 or even 4 degrees — due to terrain or obstacles. Your avionics will fly whatever angle is coded in the database, but you need to know it’s there. A steeper glidepath means a faster rate of descent at the same airspeed.
The Minimums Section: Where Your Go/No-Go Decision Lives
The minimums section is at the bottom of the plate. It lists LNAV, LNAV/VNAV, and LPV minimums in separate rows. Each row gives you the DA or MDA in MSL altitude and the required visibility in statute miles or RVR.
Circle-to-land minimums are in a separate column. If you’re circling, use that row — not the straight-in minimums. Circling means you need visual contact with the airport before you leave the published circling protected area.
Flying the RNAV Approach: From Clearance to Touchdown

Flying the RNAV approach correctly is a sequence of deliberate steps. Here’s how it goes from clearance to the runway environment.
Loading vs. Activating: These Are Not the Same Thing
When ATC clears you for the approach, you need the approach loaded and active in your GPS. Loading means it’s in the flight plan. Activating means your GPS is navigating to the appropriate fix.
If you load but don’t activate, you’re still navigating to your last enroute waypoint. ATC thinks you’re flying the approach. Your GPS disagrees. This is one of the most common setup errors in the cockpit.
Activate the approach only when ATC has cleared you and you’re ready to fly it. Don’t activate early and start chasing approach course deviations while you’re still 50 miles out on vectors.
Selecting the Right Transition
Most RNAV approaches offer multiple IAF options — often labeled as transitions in your avionics. Select the one that matches your routing. If ATC is vectoring you, select the vectors-to-final option. Some systems call it “vectors-to-final” or use an “activate leg” function to the final approach course fix.
On a vector, you won’t fly the full procedure. You’ll intercept the final approach course from a radar vector and follow the published approach from that point. Make sure your GPS reflects what you’re actually flying.
RAIM Check — Before You Need It, Not After
RAIM stands for Receiver Autonomous Integrity Monitoring. For non-WAAS GPS approaches, your unit must confirm it has enough satellite integrity to fly the approach. You can check this in flight on most units. Check it before the FAF — not at the FAF.
WAAS-equipped units handle this automatically through a more sophisticated integrity system, but it’s still good discipline to confirm your unit annunciates “LPV” or “LNAV/VNAV” before you start down. If it doesn’t, fall back to the minimums your equipment does support.
CDI Sensitivity Changes as You Fly the Approach
Your CDI sensitivity changes throughout the approach. In the enroute phase, full-scale deflection equals 2 nautical miles on each side. In terminal mode, it tightens to 1 nautical mile. On the approach inside the FAF, it goes to approach mode — about 0.3 nautical miles full-scale for LNAV, and angular sensitivity similar to ILS for LPV.
This is automatic on certified GPS units. But you’ll feel the change in how the needle moves. Don’t overcontrol. The RNAV approach needs precision, not aggressive corrections.
Decision Altitude vs. Minimum Descent Altitude
LPV and LNAV/VNAV give you a DA — a Decision Altitude. At the DA, you make the call: land or miss. You don’t level off at a DA. You’re descending through it when you decide.
LNAV gives you an MDA — a Minimum Descent Altitude. You level off at the MDA, maintain it, look for the runway environment, and either land or execute the missed approach by the MAP.
Flying through the MDA without visual contact is a violation. Missing the DA without executing the missed approach is a hazard. Know which one you’re flying before you start down.
The Missed Approach
The missed approach point on an RNAV approach is often the runway threshold — but not always. When you hit the MAP without visual contact (or lose it), execute the published missed approach immediately.
Your GPS will sequence to the missed approach holding fix automatically after the MAP. But you have to fly the missed approach procedure — climb gradient, course, altitude — exactly as published. Don’t just pull up and call ATC. Follow the procedure first, then talk.
RNAV Equipment Requirements and Database Currency

Flying an RNAV approach legally isn’t just about having GPS. It’s about having the right GPS, properly certified, with current data, in an aircraft with the right avionics approval.
What “Certified for IFR” Actually Means for Your GPS
Not every GPS can fly an RNAV approach. A portable GPS — Garmin Pilot on your iPad, a handheld unit — is not certified for IFR approaches. You need a panel-mount unit certified to TSO-C129, TSO-C145, or TSO-C146.
TSO-C129 covers older non-WAAS units. They can fly LNAV approaches when properly installed and approved in the aircraft’s AFM/POH. They can’t fly LPV.
TSO-C145 and TSO-C146 cover WAAS-capable units. C146 is the standard for approach-capable WAAS GPS. Most modern Garmin GTN and G1000 units are certified to C146.
The aircraft also needs an AFM/POH supplement that specifically approves the GPS for IFR approaches. Check the supplement. If it doesn’t say “approaches,” you can’t legally fly them.
The 28-Day Database Cycle
Navigation databases update every 28 days. For an RNAV approach to be a legal instrument procedure, your database must be current. Period.
Check the database expiration date in your avionics before every flight. Most units display it on startup. If the database is expired, you can still use the GPS for situational awareness — but you can’t fly a GPS instrument approach with it.
The reason is straightforward: approaches change. Frequencies update. Waypoints shift. DA values get revised. An expired database may not match the current published procedure. Flying an approach with outdated data means flying with unknown information.
Currency and Recency — the Pilot Side of the Equation
You need more than a certified box. You need to be current and qualified to fly the approach.
Under FAR 61.57, you need six instrument approaches in the preceding six months to stay IFR current. Those approaches don’t have to be RNAV specifically, but you do need to be proficient with your specific avionics. If you’ve been flying LNAV-only approaches on a TSO-C129 GPS and you just upgraded to a WAAS unit, get some dual instruction on LPV procedures before you rely on them in actual IMC.
We’ll be straight with you: avionics proficiency and regulatory currency are not the same thing. You can be current on paper and still be a hazard in the airplane if you haven’t flown your specific GPS under actual IFR conditions recently. Log your time, stay sharp, and train with the equipment you fly.
Common RNAV Approach Mistakes GA Pilots Make
These are the errors that show up in ASRS reports, in checkride failures, and — in the worst cases — in accident investigations. None of them are exotic. All of them are preventable.
Confusing LNAV+V Advisory Guidance with LPV
Your WAAS GPS may display an advisory vertical path even when LPV isn’t available. This “LNAV+V” guidance looks similar to an LPV glidepath on the CDI. But the minimums don’t change. You’re still flying LNAV MDA, not a DA.
Pilots who don’t understand this fly below MDA because the needle was still pointing down. That’s not LPV. That’s an LNAV RNAV approach with advisory guidance you can’t legally use for minimums.
Check what your GPS annunciates in the approach mode field. “LPV” means you’re on LPV minimums. “LNAV+V” means you’re on LNAV MDA with an advisory path. These are not the same.
Not Briefing the Missed Approach Before the FAF
The missed approach is something many pilots treat as an afterthought. They’ll deal with it if they need it. That’s backwards.
Brief the missed approach — climb gradient, initial climbing turn, the fix you’re heading to, the holding pattern entry — before you start the approach. When you go missed, workload spikes and you won’t have time to read the plate. Know it cold before you’re in the soup.
Failing to Account for Cold Temperature Corrections on LNAV/VNAV
Baro-VNAV is sensitive to temperature. Cold air is denser. Your altimeter reads too high in cold temperatures relative to actual altitude. That means the glidepath is lower than your altimeter indicates.
The FAA publishes cold temperature correction tables and adds specific airport notes on plates where corrections apply. If you’re flying LNAV/VNAV in temperatures well below ISA, check whether corrections are needed. Some avionics units apply them automatically — but you still need to know what’s happening in your system.
Arming the Approach Too Early on Vectors
When ATC vectors you for the approach, don’t activate the full procedure. Activate vectors-to-final. If you activate the full approach, your GPS may try to navigate to a fix behind you, giving you a reverse course or confusing the autopilot.
This is common when pilots rush the programming in high-workload environments. Slow down. Confirm what mode your GPS is in. “ARMED” doesn’t mean “flying.” Know the difference.
Skipping the Database Currency Check
Here’s what most pilots get wrong: they check weather, they check NOTAMs, they check fuel — but they don’t verify the GPS database is current before an IFR departure. They load the approach, it’s in the box, everything looks fine.
The problem is an expired database might still load the approach. Your unit won’t always give you a big red warning. You need to know your expiration cycle and check it yourself — every time.
Losing Situational Awareness in the Procedure Turn or Hold
RNAV approaches often include procedure turns or course reversal holds to get you aligned. The GPS sequences through these automatically — but if you bust an altitude or overshoot a fix, you can quickly end up in an unplanned position.
Stay ahead of the airplane. Know your current fix, your next fix, and the expected altitude at each one. If you ever look at the GPS and genuinely don’t know what it’s doing, climb to a safe altitude and sort it out before you continue.
Frequently Asked Questions About RNAV Approaches
Can I fly an RNAV approach with an expired GPS database if the plate hasn’t changed?
No. Legally, you can’t fly an RNAV approach with an expired navigation database, regardless of whether the procedure has changed. FAA guidance — specifically AC 90-100A — says the database must be current for IFR flight under GPS. If the database is expired, you can use the GPS for situational awareness only. You’d need to use an alternate approved navigation source for the approach itself, or update the database first.
What happens if my GPS loses WAAS signal mid-approach — do I have to go missed?
It depends on where you are and what your unit does. If you’re flying an LPV approach and WAAS integrity is lost, your unit will typically downgrade to LNAV mode. If LNAV minimums allow you to continue and you haven’t yet descended below LNAV MDA, you can continue to LNAV minimums. If you’ve already descended below LNAV MDA relying on LPV, execute the missed approach. The key is monitoring your avionics throughout the RNAV approach and knowing which minimums apply at any given moment.
Is an RNAV approach safer than an ILS in practical GA operations?
Not inherently — and that distinction matters. A properly flown ILS with current equipment is extremely reliable. LPV approaches can match ILS precision, but overall safety depends on pilot proficiency, equipment condition, and database currency. Where RNAV approaches have a practical advantage is availability: there are far more RNAV-equipped airports than ILS-equipped ones, which gives GA pilots more options in deteriorating weather. But more options don’t automatically mean more safety. Training, currency, and discipline determine outcomes — not the approach type.
Related Articles
Sources
- AC 90-100A Change 2: U.S. Terminal and En Route Area Navigation (RNAV) Operations – FAA
- Aeronautical Information Manual Chapter 1: Navigation Aids – FAA
- AIM Chapter 5 Section 4: Arrival Procedures – FAA
- Instrument Procedures Handbook (FAA-H-8083-16B) – FAA
- Wide Area Augmentation System (WAAS) – FAA
Stay current on the latest avionics and IFR procedures at the E3 Aviation Association aviation articles page. For video breakdowns of cockpit technology and instrument approaches, subscribe to the E3 Aviation YouTube channel.
